
Bots
Use Bots to create bots, rename or delete them, add channels, tune how the AI agent speaks, and get the code that puts the chat on your website. The screen lives at /settings/bots under Settings.
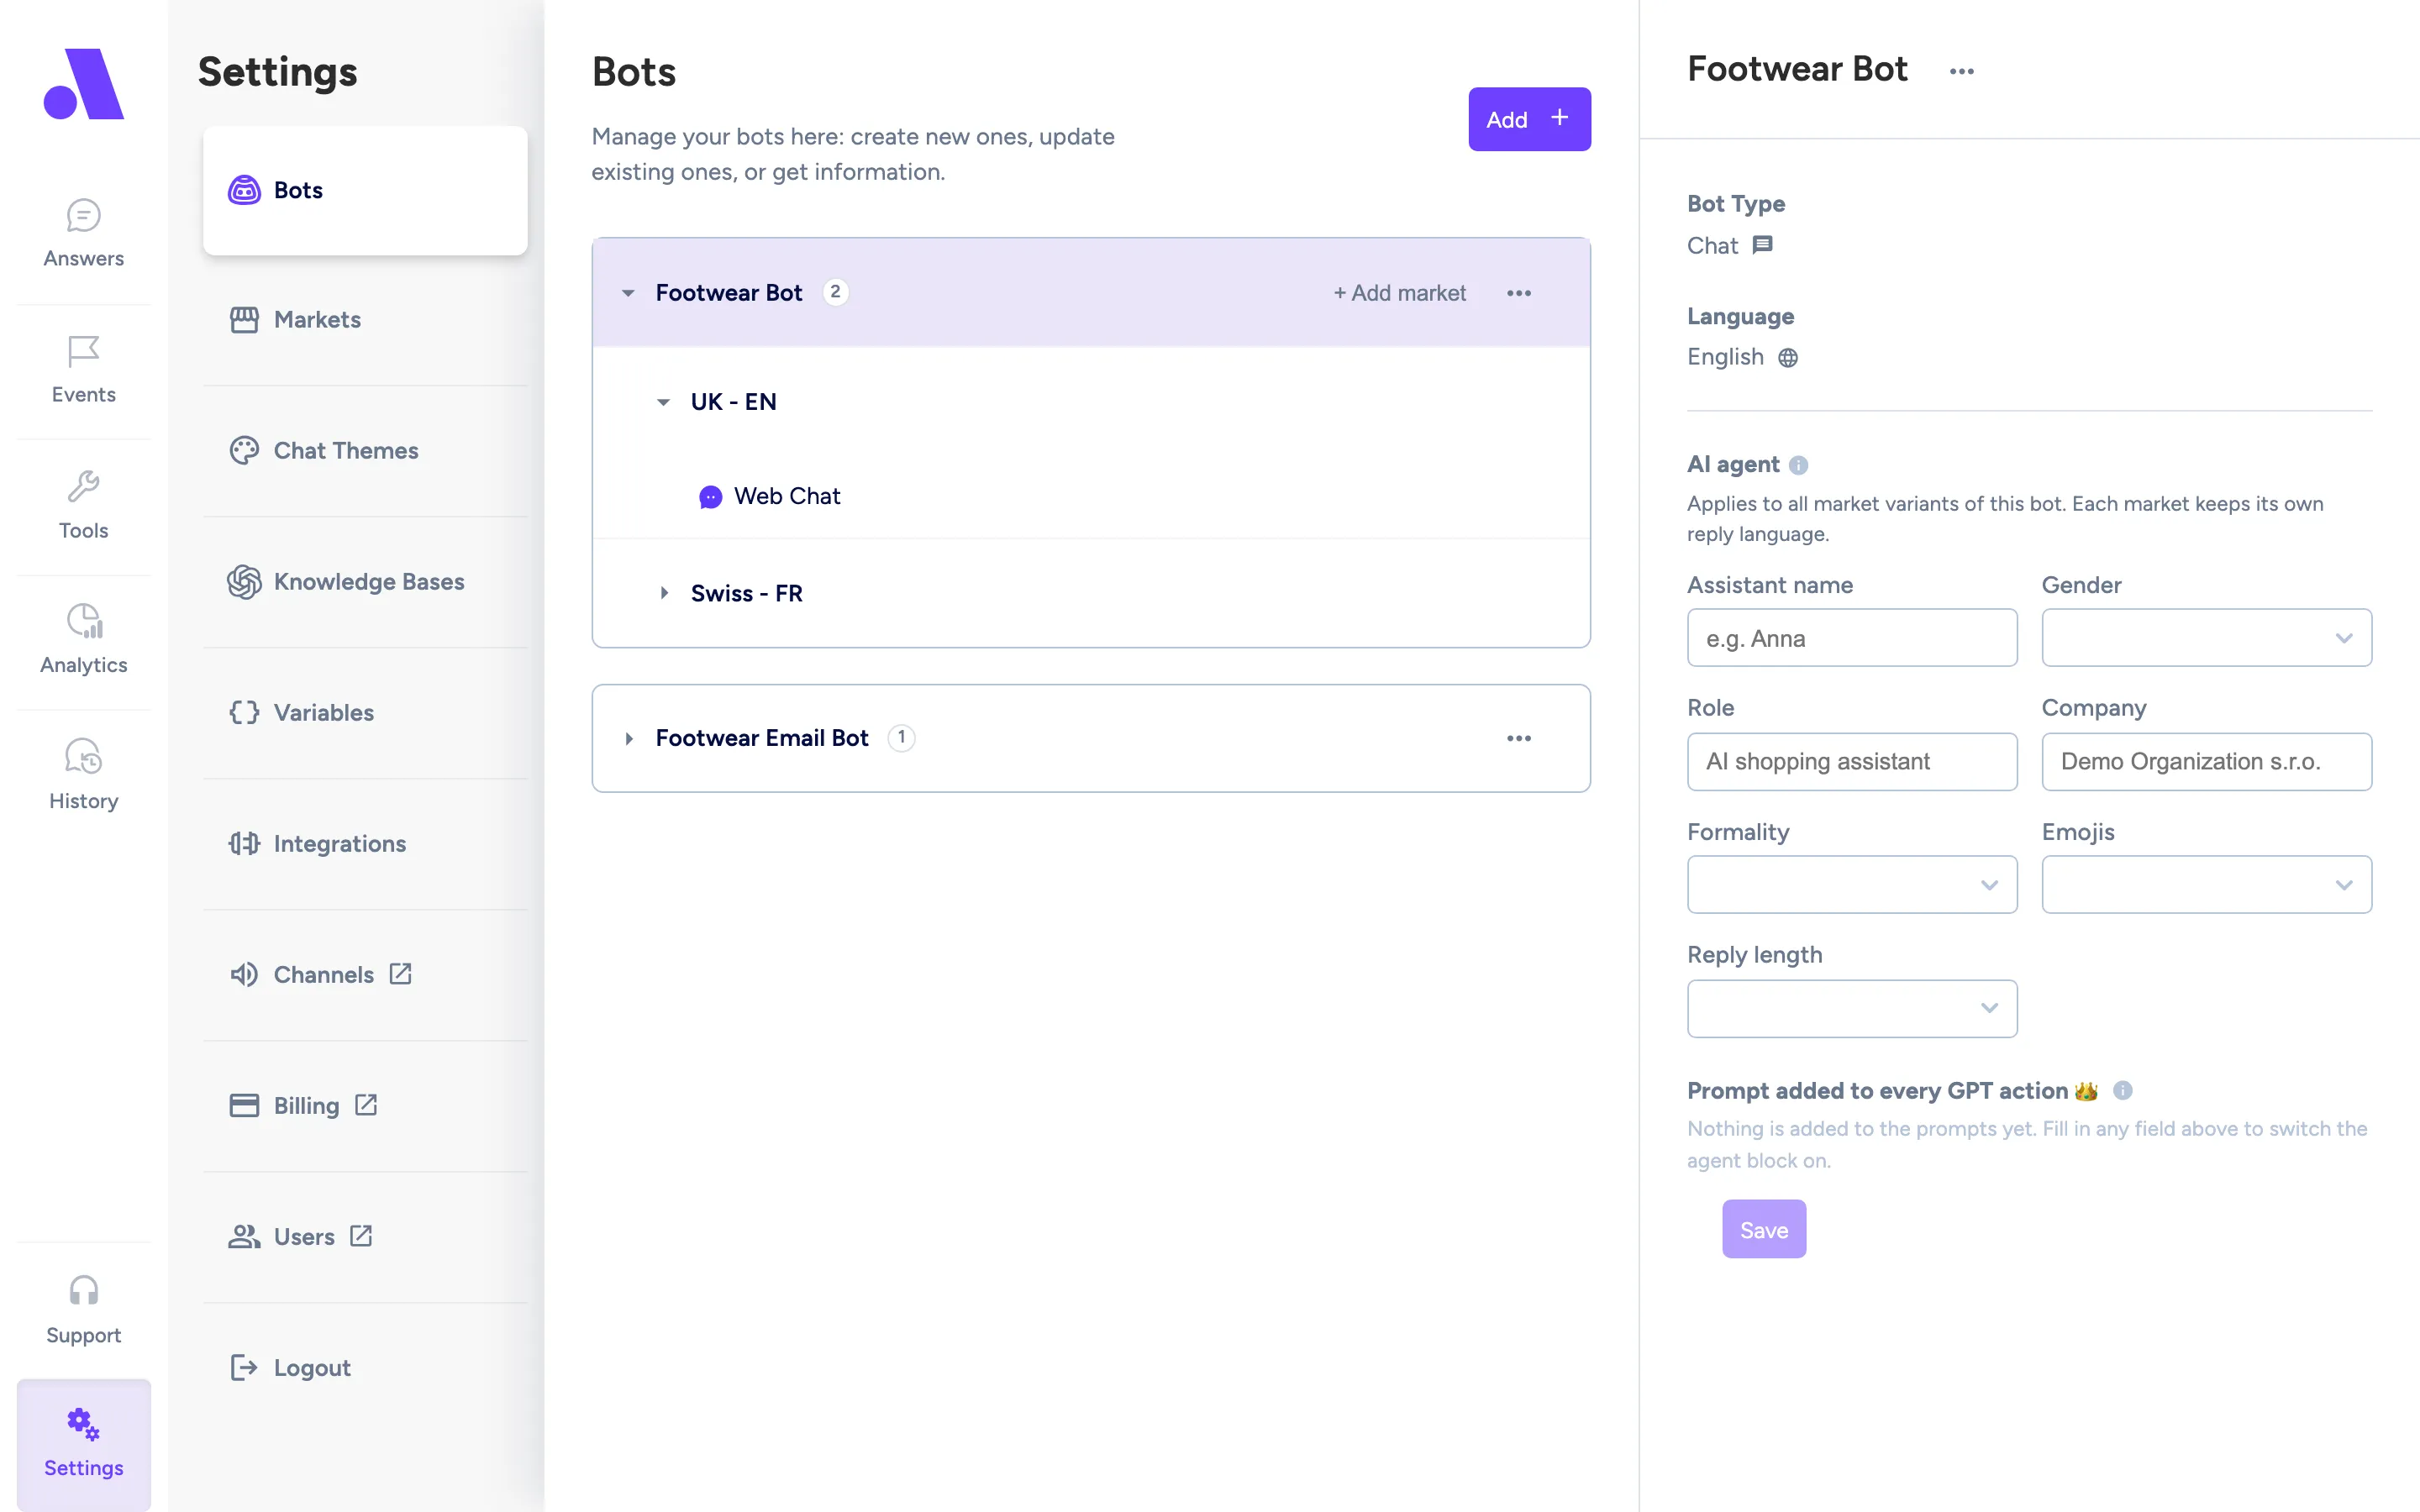
The left side lists your bots. A bot with several markets expands into markets, and each market expands into its channels. A badge next to the bot name shows how many markets (or channels) it has. Click a bot, a market or a channel to open its panel on the right.
What you can do here
Section titled “What you can do here”- Create a bot from a template or by cloning another bot.
- Rename or delete a bot from the three-dot menu next to its name.
- Convert a single bot to a multi-market bot, then add or remove markets.
- Add a channel to a bot: create a new Amio Chat or Daktela Email channel, or deploy one that already exists in your organization.
- Set the AI agent’s name, tone and reply style.
- Deploy the webchat theme and copy the install snippet.
- Try a channel without leaving the admin.
Create a bot
Section titled “Create a bot”- Click Add at the top of the list. The Create New Bot panel opens.
- Enter a Name.
- In Primary market, pick the market the bot belongs to. Markets are created in Markets.
- Under Create from, choose Template or Clone. Clone only appears when you already have at least one bot.
- Pick the template or the bot to clone from.
- Optional: tick Clone variables? and fill in the two prefixes (see Fields).
- Click Create. The button shows Created! when it works.
Convert a bot to multi-market
Section titled “Convert a bot to multi-market”- Open the three-dot menu next to the bot and choose Convert to multi-market.
- In the dialog Convert (bot name) to multi-market bot?, select the primary market.
- Click Convert. The dialog warns that this action is irreversible.
Add a market to a multi-market bot
Section titled “Add a market to a multi-market bot”- Click + Add market on the bot row. The button turns into Cancel while the panel is open.
- In the Add market panel, select an existing market. If the market has no timezone yet, you also pick a Timezone.
- Click Create.
To remove a market from a bot, open the three-dot menu on the market row and delete it. You type the market name to confirm. This stops the bot from running in that market and deletes its data there. The market itself stays in Markets and can be used by other bots.
Add a channel
Section titled “Add a channel”- Click + Add channel on a market row (or the bot row for a single-market bot).
- Use the Create tab to make a new channel, or the Deploy tab to attach a channel that already exists.
- For a new channel, enter a Name and choose the Type: Amio Chat or Daktela Email.
- For Amio Chat, set the chat theme (see Fields below).
- For Daktela Email, click Next, enter the Daktela URL and access token, then pick the queue and categories on the next step. Use Back to return to the credentials.
- Click Create (or Deploy on the Deploy tab).
On the Deploy tab, channels already used by another bot show as Deployed to (bot) and can’t be selected. Free channels show Available. Deploying an Amio Chat channel applies this market’s chat theme to it and replaces the channel’s current widget appearance.
Deploy the webchat and install it
Section titled “Deploy the webchat and install it”- Click an Amio Chat channel in the list.
- Pick a Theme and adjust the texts if needed.
- Click Deploy chat. It is disabled until a theme is selected.
- The Install the chat on your site dialog opens. Choose the JavaScript or Google Tag Manager tab and click Copy next to the snippet.
JavaScript tab: paste the first snippet before the closing </head> tag and the second one before the closing </body> tag on every page where the chat should appear.
Google Tag Manager tab: one snippet, shown as the code for <head>. Paste it into a Custom HTML tag in Google Tag Manager that fires on the pages where the chat should appear. It loads the chat script and starts it with your channel ID.
Theme and text overrides are not part of either snippet. They are stored in the app and applied after you deploy, so you don’t need to paste a new snippet when you change a theme.
Try a channel
Section titled “Try a channel”Click Try now in a channel panel. For webchat it opens the chat in a new tab. For email it opens the Try now: email dialog, where you send a test message and see the bot’s reply (see Fields).
Fields
Section titled “Fields”Create New Bot
Section titled “Create New Bot”| Field | What it does |
|---|---|
| Name | The bot’s name. Required. |
| Primary market | Market the bot is created in. If you have no markets yet, the panel links to Settings > Markets so you can create one first. |
| Create from | Template starts from a ready-made bot. Clone copies one of your existing bots. |
| Template / Clone from | The template or bot to copy from. |
| Clone variables? | Duplicates the variables that start with the “Existing prefix” and renames them with the “New prefix”. |
| Existing prefix | Prefix identifying the variables to duplicate. Fixed for templates, editable for clones. Cannot be empty. |
| New prefix | Prefix the copied variables get. Cannot be empty and must differ from the existing prefix. |
Bot summary (open a bot)
Section titled “Bot summary (open a bot)”| Field | What it does |
|---|---|
| Bot Type | Read-only. The bot’s type. |
| Language | Read-only. The bot’s language. |
| Email handoff prompt | Email bots only. Instructions for when the email bot sends a reply or hands off to an operator. Edit the default text (max 1000 characters), click Save, or use Reset to default. For a multi-market bot it applies to all markets. |
Language, the email handoff prompt and the AI agent block are only editable on a single bot or on the primary market of a multi-market bot.
AI agent
Section titled “AI agent”| Field | What it does |
|---|---|
| AI agent | Who the assistant is and how it writes. This is added to every GPT action of this bot, ahead of the action’s own prompt. For a multi-market bot it applies to all markets, and each market keeps its own reply language. |
| Assistant name | The name the assistant uses, for example Anna. |
| Gender | Not set, Female or Male. |
| Role | The assistant’s role, for example “AI shopping assistant”. |
| Company | The company the assistant speaks for. The placeholder suggests a value. |
| Formality | Not set, Formal or Informal. |
| Emojis | Not set, No emojis, In moderation or Freely. |
| Reply length | Not set, Short and to the point, or Detailed, with reasoning. |
Click Save to apply. Unsaved changes appears next to the button until you do. Leave every field on Not set (or empty) and nothing is added to the prompts. On email bots, setting Formality, Emojis or Reply length replaces the default email tone (professional, no emojis). See AI agent for how the persona is used.
Market panel
Section titled “Market panel”Selecting a market shows Market Type (Primary or Secondary), Language and Timezone, all read-only. Language and timezone come from the market.
Add channel
Section titled “Add channel”| Field | What it does |
|---|---|
| Name | Channel name. Required. |
| Type | Amio Chat or Daktela Email. Email bots default to Daktela Email. |
| Theme | Applied visuals for your chat widget. Themes load from the app when the chat connects, so saved and deployed changes apply without updating your embed script. Edit them with Manage themes or in Chat Themes. See Themes. |
| Override default text | Turns on the two text fields below. |
| Header text | Text in the chat widget header. |
| Launcher button text | Text on the button that opens the chat. |
| Existing channels (Deploy tab) | Channels in your organization that you can attach to this bot. |
If the bot has no theme, a notice says “This bot has no chat theme. Select a theme and click Deploy chat to apply it.”
Daktela Email channel
Section titled “Daktela Email channel”| Field | What it does |
|---|---|
| Daktela URL | Your Daktela address, for example https://company.daktela.com. Required. |
| Access Token | The Daktela user’s access token. Required. In Daktela go to Manage, Users, List of Users, select the user and copy the access token. The hint is hidden when your organization already has saved Daktela credentials. |
| Queue | Daktela queue this channel is connected to. Messages from other queues are not processed. Required. |
| Queue status | Status used when sending an email. Required when Daktela returns statuses. |
| Ticket category | Ticket category used when updating a ticket during handover to an operator. Required. |
| Processed category | Only process emails that have this category. All categories processes every email. Emails without a category processes only emails with no category. |
| Agent username | Daktela user name used when updating a ticket during handover to an operator. |
After you click Next, the screen loads queues, statuses and categories from Daktela. If the call fails, the error is shown under the token field and you stay on the first step. See Daktela and Email.
Try now: email
Section titled “Try now: email”| Field | What it does |
|---|---|
| From | Sender address for the test email. Required. |
| Subject | Subject of the test email. |
| Body | The message text. Required. |
| Context variables (optional) | Key and value pairs passed to the bot. Use Add variable and Remove. |
| Allow API calls | When on, the bot’s API calls and tools run for real, for example order lookups. When off, they return a placeholder response. |
Click Send. The bot’s answer name and reply appear below. After the first send the button becomes Reply, and New thread starts over. You may also see “Handed off to a human, no automatic reply” or “The bot sent no reply (check the bot’s flow / GPT configuration)”.
Delete a bot
Section titled “Delete a bot”The Delete Bot dialog asks you to type the bot’s name. Deleting removes all data for the bot. For a multi-market bot, variables scoped to its markets are deleted too. This cannot be undone.